Skip to content

We’ve all built that house: a plain box, a flat roof, and a door stuck on the front. It works, but it doesn’t wow anyone.
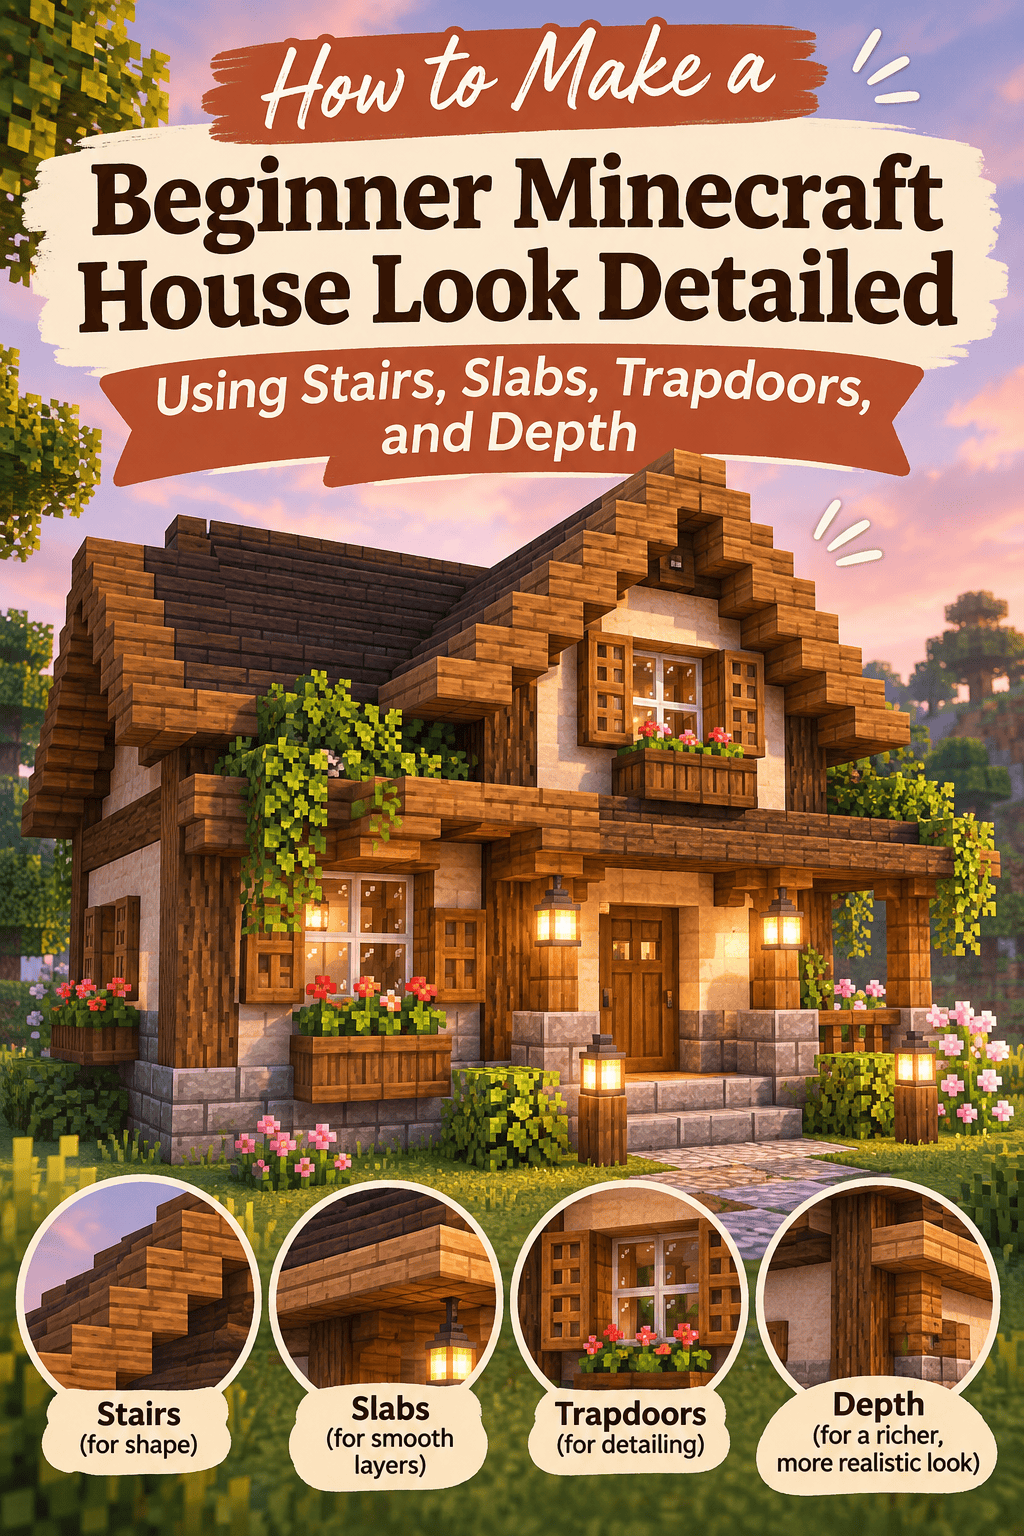
The good news? You don’t need fancy mods or hours of experience. A few simple blocks and one big idea, depth, can turn a basic cottage into a build that looks like it belongs on a showcase server. Let’s upgrade yours.

Start With the Power of Depth
Flat walls are what make beginner builds look basic. Depth fixes that fast.
- Push windows and doors one block inward
- Pull pillars and trim one block outward
- Mix wall materials so surfaces don’t feel uniform
- Break up long walls with bumps or recesses
Tip: Aim for at least three layers of depth on every wall: recessed, flat, and protruding.
Choose a Simple Block Palette
Too many blocks make a build look messy. Stick to a tidy set.
- Main wall: one light block, like birch planks or white concrete
- Frame and trim: one dark wood, like spruce or dark oak
- Base: cobblestone, stone bricks, or deepslate
- Accent: a pop of color, like flowers, banners, or terracotta
Use the 60-30-10 rule: 60% main walls, 30% trim and roof, 10% accents.

Use Stairs for Rooflines
Stairs are your best friend for roofs, trim, and shaping.
- Build the roof base with stairs facing upward on each side.
- Add a row of upside-down stairs under the edge for a layered eave.
- Cap the peak with slabs for a smooth ridge.
- Extend the roof one block past the wall for an overhang.
A slight overhang adds instant realism and shadow.
Add Slabs for Subtle Detail
Slabs create half-block shifts that make surfaces feel handcrafted.
- Use slabs as window sills and ledges
- Build a slab trim line between floors
- Make a half-block raised porch or foundation
- Create roof edges that step down gradually
- Craft little benches and tables with slabs on stairs
Switch between top and bottom slabs to create ripples and texture.
Trapdoors Are Detail Heroes
Trapdoors are the secret to most “pro” looks.
- Shutters: Place open trapdoors on both sides of windows
- Window panes: Add closed trapdoors above for frames
- Roof trim: Place under roof edges for a decorative lip
- Chimney caps: Use closed trapdoors for a finished top
- Furniture: Make chairs, shelves, and tables
Pro tip: Use a contrasting wood for shutters so they pop against the walls.

Frame Everything With Beams
Wooden beams make walls feel structured and real.
- Place logs or stripped logs on every corner.
- Add horizontal beams between floors.
- Run diagonal or vertical beams across the walls for a Tudor look.
- Bring beams inward or outward for more depth.
Keep the beams in a darker wood than the walls for contrast.
Build the Foundation and Base
Don’t let your house float on the grass.
- Add a stone or cobblestone base one or two blocks high
- Mix in mossy or cracked variants for texture
- Add small steps or a slab-built porch at the entrance
- Use stairs to make a stone lip around the base
Landscape and Final Touches
A great house needs a great setting.
- Paths: Mix gravel, dirt paths, and cobblestone
- Plants: Add flowers, bushes made from leaves, and tall grass
- Fences: Use short fences and gates for a cozy yard
- Lanterns: Hang them from posts, eaves, and trees
- Details: Add barrels, hay bales, and a little garden patch

Design the Interior
Don’t forget the inside. Even a small interior feels huge with detail.
- Use stairs for chairs and sofas
- Place carpets for rugs and trapdoors for tables
- Hang paintings and banners on the walls
- Add a fireplace with campfire and stone bricks
- Use item frames and flower pots for shelves
Warm lighting from lanterns and candles sets a cozy mood.

Quick Build Checklist
- Recess windows and doors
- Add trim and corner beams
- Use stairs and slabs on the roof
- Put trapdoor shutters on every window
- Mix at least two textures per wall
- Add lanterns and plants outside
- Furnish the inside
Final Thoughts
Great Minecraft builds aren’t about having more blocks. They’re about using the right ones with intention. Stairs, slabs, trapdoors, and depth turn a simple box into a home with personality. Start with one wall, add detail, and watch the whole build come to life.
Loved this guide? Save this post to your Minecraft Builds board and upgrade your first house this weekend!